APIs in Python
This page will focus on using Python to gather data via APIs.
But first! – Make sure you read and learn about APIs
(This page has several code examples. Scroll to the bottom to see Python code that gathers LABELED data using a news API)
How Do APIs Work? – and How do they work in Python?
The long answer to this question can be located by clicking the blue link above.
In Python, we need a library, a method, to allow us to access another application and to gather data.
First – consider a few things:
- An application that shares data has a lot of data. You may only want SPECIFIC data from the app. How do we GET specific data?
- Applications that share data have limitations. Make sure to read the documentation for that specific app. They are all different.
OK – now for the good stuff:
We can access data using the specific END POINT (a URL) defined by the application’s API documentation. You cannot avoid reading at least some of the documentation because each END POINT is unique to each app. An end point is a URL that offers access to the server and/or folders where the data you want is located.
Here is an EXAMPLE of an END POINT
This one is from the newsapi.org site. This site shares data on news articles.
The image below shows that under Documentation on the left, one can locate and read about the end point, folder options, and parameter options.
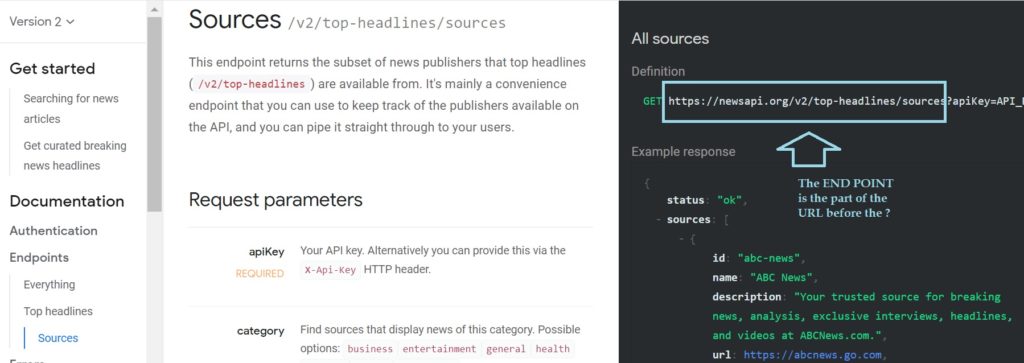
This is telling us the following:
- The base URL to the server(s) that house the data for the NewsAPI.org website is: https://newsapi.org
- Next, the image here illustrates that within https://newsapi.org is a folder (a directory) called “v2” and within the v2 folder is another folder called “top-headlines” – AND – in the top-headlines folder is a folder called “sources”. This is the PATH to some of the data that newsapi is sharing.
- This URL (full path tot he data) looks like this: https://newsapi.org/v2/top-headlines/sources
BUT – this is only the first step. In addition, newsapi.org offers a few different paths (end points) that you can use to access data. For example, the following image shows a second option:

Here, you can again see that under Documentation, there is an Endpoint called “Everything”. This is unique to newsapi.org. Remember, each site/app has its own endpoint(s) defined.
The URL (path) to this endpoint is: https://newsapi.org/v2/everything
That tells us that the server is https://newsapi.org and that on that server is a folder called v2 and in that folder is a folder called “everything” where we can access data.
The next step requires us to (1) get an API KEY and (2) understand the use the right parameters (key/value pairs).
Each site/application has a different process for getting a KEY so that you can use their data. The newsapi.org site makes the process VERY easy. You simply click on “Get API Key”. On the same page you can also see the Get Started and the Documentation. Most sites also have “Pricing” for those who want to exceed the free data limit.
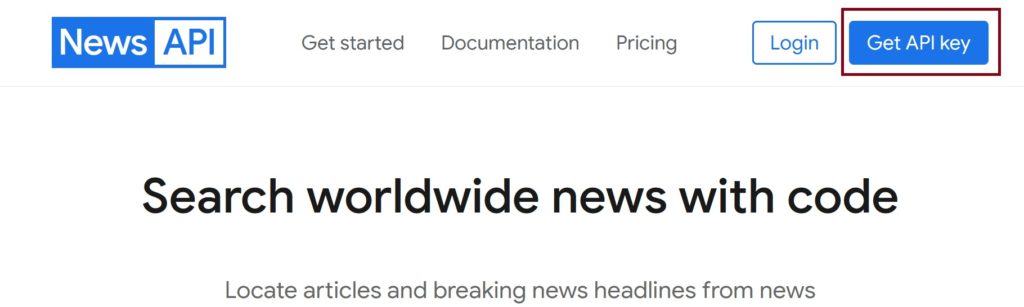
So – get a KEY and log in!
Now – we need to look at the parameters.
Each API/Site has its own set of parameters. The concept is the same for all APIs, but the exact names and values are unique to each site. In Example 1 below, you can see that the site refers to “Request Parameters”. When you make a request for data from the newsapi site, you can specify parameters in your request. Such as, you can get news articles only about bitcoin, or only written by a certain news group, etc.
In this example, we are only looking at two parameters. One is the apiKey. The “K” must be uppercase – the case matters! The apiKey is a REQUIRED parameter. This means that the request will fail without a value key.
The second parameter in this example is called “q”. As noted in the image after q, the “q” parameter allows you to search for a specific keyword or phrase.
Parameter = Value pairs
A parameter=value pair is used in the request URL to GET the data you want and to give the API your key, etc.
Example 1: Here – the part of the URL before the “?” is the endpoint. The “?” tells the Browser that this is a QUERY. The “?” is not optional. After the “?” are the parameter=value pairs (also sometimes called name/value or key/value pairs). Here we have two of them.
We have q=bitcoin and we have apiKey=whatever your key is
https://newsapi.org/v2/everything?q=bitcoin&apiKey=8fcxxxxx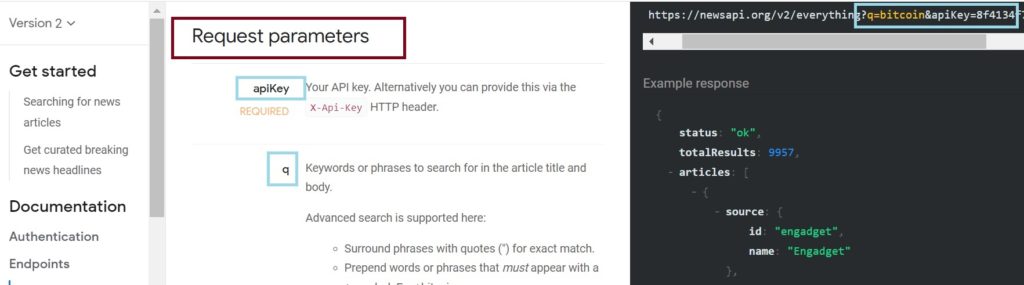
TIME TO TEST THIS BY HAND!
Anytime you can test something by hand (before coding it) you should. Keep it small and simple.
Step 1: Be sure you have a Key.
Step 2: Open notepad and create the entire URL.
So mine is:
https://newsapi.org/v2/everything?q=bitcoin&apiKey=8f4134f7xxxxxxxx
Yours will look the same except you will use YOUR key.

Now - paste this into a new window/browser/tab and press ENTER.
You should get something that looks like this (each day the news is different so the article will not be same :)

If you got this – it worked and you are all set to do this using Python (and R). If not – there is likely a typo or issue with your URL. Check to make sure the “K” is uppercase, there are no extra spaces anywhere, you have the & between each parameter=value pair, etc.
Let’s talk about ? and &:
In a REQUEST a URL that allows you GET data from an API, you will notice that they all have a similar FORMAT.
endpoint?param=value¶m=value¶m=value
The endpoint in our case is: https://newsapi.org/v2/everything
Recall that these “endpoints” are defined by each API site.
Our param=value pairs are: q=bitcoin&apiKey=8f4134f7xxxxxxxx
- There MUST be a “?” between the endpoint and the first param=value pair
- There MUST be an “&” between each param=value pairs.
- There MUST be an “=” between each param=value pair.
Why does all of this matter?
Because if you do not understand it and cannot do it by hand, how can you get Python to do it 🙂
THREE MORE NOTES:
- There are often many parameter and value options. You can find them all by reviewing each API site to see what that API lets you query.
- It is sometimes an option to get the results back as text, or HTML, or JSON, etc. Our results above are in JSON format (which is a bit like XML with a loose format).
- Getting this data is only step 1. Once you get at it, you need to save it, store it, clean it, and format it for further analysis.
APIs and request in Python
We will use the following libraries in Python. The requests library will allow us to access (GET or make the query) of another server via the API. You must be online.
import requests  #to query the API
import re  #regular expressions
import pandas as pd   # for dataframes

from sklearn.feature_extraction.text import CountVectorizer
#for text vectorization


## The code ##

##This is one of the endpoint options you can read about on newsapi.org
End="https://newsapi.org/v1/articles"

##################################################Gates#
## WAY 1
## This is Dictionary Style. Here, we build a dictionary
## structure in Python and then use this to query the
## data.
##
##  Notice that apiKey here has the "K" upper case
##  just like we had to do earlier. The details matter.
##  Notice also that we have several parameters now....
##  These are came from the newsapi.org site and each
##  must be written EXACTLY as shown on the site.
##  For example, the S in pageSize is uppercase.
#########################################################
URLPost = {'apiKey':'8f413xxxxxx YOUR KEY HERE 0f22b',
                    'source': 'bbc-news',
                    'pageSize': 85,
                    'sortBy' : 'top',
                    'totalRequests': 75}

## Here we can print what we built
## It will print as a dictionary
print(URLPost)

## Here, we use the requests library in Python to
## access the API and get the data
## The requests library has a method called "get"
## that we will use.
## We give "requests.get" two things: the endpoint,
## which is called End in this code and the
## dictionary we built above called URLPost
response1=requests.get(End, URLPost)
print(response1)

## We MUST do this as well to see the results
## The results will be as json text and so we will use json
## to grab data from this text.
jsontxt = response1.json()
print(jsontxt)


####################################################
### WAY 2
##  This is simply another option for using requests
##  in Python. I use Way 1 when I want to place variables
##  into the dictionary structure. I use Way 2 when I want a
##  copy of the URL generated.
##  You can use whichever way you need for your goals
## - The right tool for the job....
##########################################################
url = ('https://newsapi.org/v2/everything?'
       'q=bitcoin&'
       #'from=2021-02-06&'
       #'to=2020-03-07&'
       'sources=bbc-news&'
       'pageSize=100&'
       'apiKey=8f4134f7d0 - your key - 1e22100f22b'
       #'qInTitle=Georgetown&'
       #'country=us'
)

## Some of the parameters are commented out. They are options.
print(url)

## This give you the following...comment this out if you paste it
https://newsapi.org/v2/everything?q=bitcoin&sources=bbc-news&pageSize=100&apiKey=8f4134fxxxxxxYourKEY

## Here again, we are using requests.get
## We can just give requests.get the url we made.
response2 = requests.get(url)
jsontxt2 = response2.json()
print(jsontxt2, "\n")

## NOTES
## Notice that in Way 1, we made a dictionary.
## We DID NOT include ? or &. The DETAILS MATTER!
## In Way 2, we built the URL by hand and so put everything
## we needed into it.

## Try this out. Change the values of the params, etc.
## Once you can get this data - try a different API
OK! So there are the details for two methods of grabbing data via API using Python.
NOTES:
- Not all APIs are the same. Some are easy to use like this one.
- Others, like Twitter, require 4 keys! and LOTS of steps 😉
- The details and documentation always matter.
# -*- coding: utf-8 -*-
"""
Created on Mon Feb 10 11:28:27 2025

@author: profa
"""

#################################################Gates
## API Example
## Gates
##
## JSON and newsapi.org
##
## YOU will need to get your own API key to run this code
## newsapi.org
##############################################################
import requests  #to query the API
import re  #regular expressions
import pandas as pd   # for dataframes

from sklearn.feature_extraction.text import CountVectorizer
##This is one of the endpoint options you can read about on newsapi.org
End="https://newsapi.org/v2/everything"

URLPost = {'apiKey':'8f4134 YOUR KEY HERE 100f22b',
                    'q': 'football',
                    'sources': 'fox-news',
                    'pageSize' : 30,
                    'language': 'en'}

response3=requests.get(End, URLPost)
print(response3)

## We MUST do this as well to see the results
## The results will be as json text and so we will use json
## to grab data from this text.
jsontxt3 = response3.json()
print(jsontxt3)

## Create a new csv file to save the headlines
filename="NewsHeadlines3.csv"

MyFILE=open(filename,"w")
### Place the column names in - write to the first row
WriteThis="Date,Source,Title,Headline\n"
MyFILE.write(WriteThis)
MyFILE.close()
## Open the file for append
MyFILE=open(filename, "a")

## Go through the json text:
for items in jsontxt3["articles"]:
    Source=items["source"]["id"]
    print(Source)

    Date=items["publishedAt"]
    ##clean up the date
    NewDate=Date.split("T")
    Date=NewDate[0]
    print(Date)

    Title=items["title"]
    Title=re.sub(r'[^a-zA-Z]', " ", Title, flags=re.VERBOSE)
    Title=Title.replace(',', '')
    Title=' '.join(Title.split())
    Title=re.sub("\n|\r", "", Title)
    ##----------------------------------------------------------

    Headline=items["description"]
    Headline=re.sub(r'[^a-zA-Z]', " ", Headline, flags=re.VERBOSE)
    ## Be sure there are no commas in the headlines or it will
    ## write poorly to a csv file....
    Headline=Headline.replace(',', '')
    Headline=' '.join(Headline.split())
    Headline=re.sub("\n|\r", "", Headline)

    ### AS AN OPTION - remove words of a given length............
    Headline = ' '.join([wd for wd in Headline.split() if len(wd)>3])

    WriteThis=str(Date)+","+str(Source)+","+ str(Title) + "," + str(Headline) + "\n"
    MyFILE.write(WriteThis)

## CLOSE THE FILE
MyFILE.close()

############### PROCESS THE FILE ######################

## Read to DF
BBC_DF=pd.read_csv(filename)
print(BBC_DF.head())
# iterating the columns
for col in BBC_DF.columns:
    print(col)

print(BBC_DF["Headline"])

## REMOVE any rows with NaN in them
BBC_DF = BBC_DF.dropna()
print(BBC_DF["Headline"])

### Tokenize and Vectorize the Headlines
## Create the list of headlines
HeadlineLIST=[]
for next1 in BBC_DF["Headline"]:
    HeadlineLIST.append(next1)

print("The headline list is")
print(HeadlineLIST)

### Vectorize
## Read about CountVectorizer here.....
#https://scikit-learn.org/stable/modules/generated/sklearn.feature_extraction.text.CountVectorizer.html

MyCountV=CountVectorizer(
        input="content",
        lowercase=True,
        stop_words = "english",
        max_features=20
        )

MyDTM = MyCountV.fit_transform(HeadlineLIST)  # create a sparse matrix
print(type(MyDTM))

ColumnNames=MyCountV.get_feature_names_out()
MyDTM_DF=pd.DataFrame(MyDTM.toarray(),columns=ColumnNames)
print(MyDTM_DF)

## Write the dataframe to a csv file
MyDTM_DF.to_csv('CleanNews.csv')
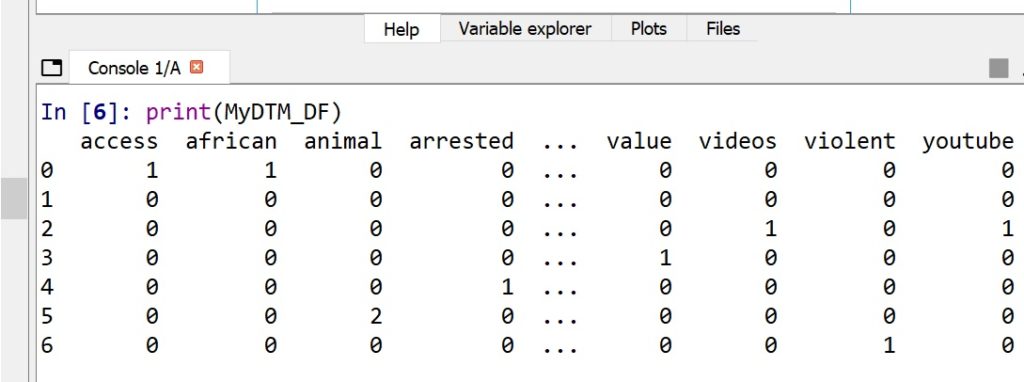
If all goes well – you will create a dataframe (each rwo is an article) that looks like this. This is tokenized and vectorized text data. Each word is now a column and each row is an article.
On the day I ran this code, some of the headlines for q=bitcoin were
[‘Some people Central African Republic lack access internet needed Bitcoin’, ‘cryptocurrency crash hurting many investors including country that Bitcoin’, ‘YouTube being criticised failing tackle network scammers streaming fake Elon Musk videos’, ‘value Bitcoin month cryptocurrency market continues tumble’, ‘says lost millions then arrested trying talk crypto boss Kwon’, ‘Chivo Pets animal hospital which opened Salvador February provides whatever care animal needs just cents long payment made with Bitcoin’, ‘suspected carrying violent frightening attacks’]
These headlines, aftern tokenization and vectorization, created this dataframe:
Example Code 2: This code uses the news API to gather, clean, save, and evaluate LABELED data.
# -*- coding: utf-8 -*-
"""
Created on Wed Feb  5 19:21:35 2025

@author: profa
"""

########################################
## 2021 - Gates
##
## Topics:
    # Data gathering via API
    #  - URLs and GET
    # Cleaning and preparing text DATA
    # DTM and Data Frames
    # Training and Testing at DT
    # CLustering
    ## LDA

#########################################


## ATTENTION READER...
##
## First, you will need to go to
## https://newsapi.org/
## https://newsapi.org/register
## and get an API key


################## DO NOT USE MY KEY!!
## Get your own key.
##
###################################################


### API KEY  - get a key!
##https://newsapi.org/

## Example URL
## https://newsapi.org/v2/everything?
## q=tesla&from=2021-05-20&sortBy=publishedAt&
## apiKey=YOUR KEY HERE


## What to import
import requests  ## for getting data from a server GET
import re   ## for regular expressions
import pandas as pd    ## for dataframes and related
from pandas import DataFrame

## To tokenize and vectorize text type data
from sklearn.feature_extraction.text import CountVectorizer
import numpy as np
## For word clouds
## conda install -c conda-forge wordcloud
## May also have to run conda update --all on cmd
#import PIL
#import Pillow
#import wordcloud
from wordcloud import WordCloud, STOPWORDS
import matplotlib.pyplot as plt


from sklearn.model_selection import train_test_split
import random as rd
from sklearn.naive_bayes import MultinomialNB
from sklearn.metrics import confusion_matrix
#from sklearn.naive_bayes import BernoulliNB
from sklearn.tree import DecisionTreeClassifier, plot_tree
from sklearn import tree
## conda install python-graphviz
## restart kernel (click the little red x next to the Console)
import graphviz

from sklearn.decomposition import LatentDirichletAllocation
import matplotlib.pyplot as plt
import numpy as np

from sklearn.metrics import silhouette_samples, silhouette_score
import sklearn
from sklearn.cluster import KMeans

from sklearn import preprocessing

import seaborn as sns
import numpy as np
import pandas as pd
from sklearn.metrics.pairwise import euclidean_distances
from sklearn.metrics.pairwise import cosine_similarity
import matplotlib.pyplot as plt
from sklearn.manifold import MDS
from mpl_toolkits.mplot3d import Axes3D
from scipy.cluster.hierarchy import ward, dendrogram


####################################
##
##  Step 1: Connect to the server
##          Send a query
##          Collect and clean the
##          results
####################################

####################################################
##In the following loop, we will query thenewsapi servers
##for all the topic names in the list
## We will then build a large csv file
## where each article is a row
##
## From there, we will convert this data
## into a labeled dataframe
## so we can train and then test our DT
## model
####################################################

####################################################
## Build the URL and GET the results
## NOTE: At the bottom of this code
## commented out, you will find a second
## method for doing the following. This is FYI.
####################################################

## This is the endpoint - the server and
## location on the server where your data
## will be retrieved from

## TEST FIRST!
## We are about to build this URL:
## https://newsapi.org/v2/everything?apiKey=8f4134f7d0de43b8b49f91e22100f22b&q=bitcoin


topics=["politics", "analytics", "business", "sports"]


## topics needs to be a list of strings (words)
## Next, let's build the csv file
## first and add the column names
## Create a new csv file to save the headlines
filename="NewHeadlines.csv"
MyFILE=open(filename,"w")  # "a"  for append   "r" for read
## with open
### Place the column names in - write to the first row
WriteThis="LABEL,Date,Source,Title,Headline\n"
MyFILE.write(WriteThis)
MyFILE.close()

## CHeck it! Can you find this file?

#### --------------------> GATHER - CLEAN - CREATE FILE

## RE: documentation and options
## https://newsapi.org/docs/endpoints/everything

endpoint="https://newsapi.org/v2/everything"

################# enter for loop to collect
################# data on three topics
#######################################

for topic in topics:

    ## Dictionary Structure
    URLPost = {'apiKey':'8f4134f7d0de43b8b49f91e22100f22b',
               'q':topic
    }

    response=requests.get(endpoint, URLPost)
    print(response)
    jsontxt = response.json()
    print(jsontxt)
    #####################################################


    ## Open the file for append
    MyFILE=open(filename, "a")
    LABEL=topic
    for items in jsontxt["articles"]:
        print(items, "\n\n\n")

        #Author=items["author"]
        #Author=str(Author)
        #Author=Author.replace(',', '')

        Source=items["source"]["name"]
        print(Source)

        Date=items["publishedAt"]
        ##clean up the date
        NewDate=Date.split("T")
        Date=NewDate[0]
        print(Date)

        ## CLEAN the Title
        ##----------------------------------------------------------
        ##Replace punctuation with space
        # Accept one or more copies of punctuation
        # plus zero or more copies of a space
        # and replace it with a single space
        Title=items["title"]
        Title=str(Title)
        #print(Title)
        Title=re.sub(r'[,.;@#?!&$\-\']+', ' ', str(Title), flags=re.IGNORECASE)
        Title=re.sub(' +', ' ', str(Title), flags=re.IGNORECASE)
        Title=re.sub(r'\"', ' ', str(Title), flags=re.IGNORECASE)

        # and replace it with a single space
        ## NOTE: Using the "^" on the inside of the [] means
        ## we want to look for any chars NOT a-z or A-Z and replace
        ## them with blank. This removes chars that should not be there.
        Title=re.sub(r'[^a-zA-Z]', " ", str(Title), flags=re.VERBOSE)
        Title=Title.replace(',', '')
        Title=' '.join(Title.split())
        Title=re.sub("\n|\r", "", Title)
        print(Title)
        ##----------------------------------------------------------

        Headline=items["description"]
        Headline=str(Headline)
        Headline=re.sub(r'[,.;@#?!&$\-\']+', ' ', Headline, flags=re.IGNORECASE)
        Headline=re.sub(' +', ' ', Headline, flags=re.IGNORECASE)
        Headline=re.sub(r'\"', ' ', Headline, flags=re.IGNORECASE)
        Headline=re.sub(r'[^a-zA-Z]', " ", Headline, flags=re.VERBOSE)
        ## Be sure there are no commas in the headlines or it will
        ## write poorly to a csv file....
        Headline=Headline.replace(',', '')
        Headline=' '.join(Headline.split())
        Headline=re.sub("\n|\r", "", Headline)

        ### AS AN OPTION - remove words of a given length............
        Headline = ' '.join([wd for wd in Headline.split() if len(wd)>3])

        #print("Author: ", Author, "\n")
        #print("Title: ", Title, "\n")
        #print("Headline News Item: ", Headline, "\n\n")

        #print(Author)
        print(Title)
        print(Headline)

        WriteThis=str(LABEL)+","+str(Date)+","+str(Source)+","+ str(Title) + "," + str(Headline) + "\n"
        print(WriteThis)

        MyFILE.write(WriteThis)

    ## CLOSE THE FILE
    MyFILE.close()

################## END for loop

####################################################
##
## Where are we now?
##
## So far, we have created a csv file
## with labeled data. Each row is a news article
##
## - BUT -
## We are not done. We need to choose which
## parts of this data to use to model our decision tree
## and we need to convert the data into a data frame.
##
########################################################


BBC_DF=pd.read_csv(filename)
print(BBC_DF.head())
# iterating the columns
for col in BBC_DF.columns:
    print(col)

print(BBC_DF["Headline"])

## REMOVE any rows with NaN in them
BBC_DF = BBC_DF.dropna()
print(BBC_DF["Headline"])

### Tokenize and Vectorize the Headlines
## Create the list of headlines
## Keep the labels!

HeadlineLIST=[]
LabelLIST=[]

for nexthead, nextlabel in zip(BBC_DF["Headline"], BBC_DF["LABEL"]):
    HeadlineLIST.append(nexthead)
    LabelLIST.append(nextlabel)

print("The headline list is:\n")
print(HeadlineLIST)

print("The label list is:\n")
print(LabelLIST)


##########################################
## Remove all words that match the topics.
## For example, if the topics are food and covid
## remove these exact words.
##
## We will need to do this by hand.
NewHeadlineLIST=[]

for element in HeadlineLIST:
    print(element)
    print(type(element))
    ## make into list
    AllWords=element.split(" ")
    print(AllWords)

    ## Now remove words that are in your topics
    NewWordsList=[]
    for word in AllWords:
        print(word)
        word=word.lower()
        if word in topics:
            print(word)
        else:
            NewWordsList.append(word)

    ##turn back to string
    NewWords=" ".join(NewWordsList)
    ## Place into NewHeadlineLIST
    NewHeadlineLIST.append(NewWords)


##
## Set the     HeadlineLIST to the new one
HeadlineLIST=NewHeadlineLIST
print(HeadlineLIST)
#########################################
##
##  Build the labeled dataframe
##
######################################################

### Vectorize
## Instantiate your CV
MyCountV=CountVectorizer(
        input="content",  ## because we have a csv file
        lowercase=True,
        stop_words = "english",
        max_features=50
        )

## Use your CV
MyDTM = MyCountV.fit_transform(HeadlineLIST)  # create a sparse matrix
print(type(MyDTM))


ColumnNames=MyCountV.get_feature_names_out()
#print(type(ColumnNames))


## Build the data frame
MyDTM_DF=pd.DataFrame(MyDTM.toarray(),columns=ColumnNames)

## Convert the labels from list to df
Labels_DF = DataFrame(LabelLIST,columns=['LABEL'])

## Check your new DF and you new Labels df:
print("Labels\n")
print(Labels_DF)
print("News df\n")
print(MyDTM_DF.iloc[:,0:6])

##Save original DF - without the lables
My_Orig_DF=MyDTM_DF
print(My_Orig_DF)
######################
## AND - just to make sure our dataframe is fair
## let's remove columns called:
## food, bitcoin, and sports (as these are label names)
######################
#MyDTM_DF=MyDTM_DF.drop(topics, axis=1)


## Now - let's create a complete and labeled
## dataframe:
dfs = [Labels_DF, MyDTM_DF]
print(dfs)

Final_News_DF_Labeled = pd.concat(dfs,axis=1, join='inner')
## DF with labels
print(Final_News_DF_Labeled)


#############################################
##
## Create Training and Testing Data
##
## Then model and test the Decision Tree
##
################################################


## Before we start our modeling, let's visualize and
## explore.

##It might be very interesting to see the word clouds
## for each  of the topics.
##--------------------------------------------------------
List_of_WC=[]

for mytopic in topics:

    tempdf = Final_News_DF_Labeled[Final_News_DF_Labeled['LABEL'] == mytopic]
    print(tempdf)

    tempdf =tempdf.sum(axis=0,numeric_only=True)
    #print(tempdf)

    #Make var name
    NextVarName=str("wc"+str(mytopic))
    #print( NextVarName)

    ##In the same folder as this code, I have three images
    ## They are called: food.jpg, bitcoin.jpg, and sports.jpg
    #next_image=str(str(mytopic) + ".jpg")
    #print(next_image)

    ## https://amueller.github.io/word_cloud/generated/wordcloud.WordCloud.html

    ###########
    ## Create and store in a list the wordcloud OBJECTS
    #########
    NextVarName = WordCloud(width=1000, height=600, background_color="white",
                   min_word_length=4, #mask=next_image,
                   max_words=200).generate_from_frequencies(tempdf)

    ## Here, this list holds all three wordclouds I am building
    List_of_WC.append(NextVarName)


##------------------------------------------------------------------
print(List_of_WC)
##########
########## Create the wordclouds
##########
fig=plt.figure(figsize=(25, 25))
#figure, axes = plt.subplots(nrows=2, ncols=2)
NumTopics=len(topics)
for i in range(NumTopics):
    print(i)
    ax = fig.add_subplot(NumTopics,1,i+1)
    plt.imshow(List_of_WC[i], interpolation='bilinear')
    plt.axis("off")
    plt.savefig("NewClouds.pdf")


###########################################################
##
##
##                  Clustering
##
##
############################################################
## Our DF
print(My_Orig_DF)

#from sklearn.metrics import silhouette_samples, silhouette_score
#from sklearn.cluster import KMeans

My_KMean= KMeans(n_clusters=3)
My_KMean.fit(My_Orig_DF)
My_labels=My_KMean.predict(My_Orig_DF)
print(My_labels)

#from sklearn import preprocessing
#from sklearn.cluster import KMeans
#import seaborn as sns

My_KMean2 = KMeans(n_clusters=4).fit(preprocessing.normalize(My_Orig_DF))
My_KMean2.fit(My_Orig_DF)
My_labels2=My_KMean2.predict(My_Orig_DF)
print(My_labels2)

My_KMean3= KMeans(n_clusters=3)
My_KMean3.fit(My_Orig_DF)
My_labels3=My_KMean3.predict(My_Orig_DF)
print("Silhouette Score for k = 3 \n",silhouette_score(My_Orig_DF, My_labels3))


#https://docs.scipy.org/doc/scipy/reference/generated/scipy.cluster.hierarchy.linkage.html
#length of the document: called cosine similarity
cosdist = 1 - cosine_similarity(MyDTM)
print(cosdist)
print(np.round(cosdist,3))  #cos dist should be .02

#----------------------------------------------------------
## Hierarchical Clustering using ward and cosine sim
linkage_matrix = ward(cosdist) #define the linkage_matrix
#using ward clustering pre-computed distances
print(linkage_matrix)
fig = plt.figure(figsize=(25, 10))
dn = dendrogram(linkage_matrix)
plt.show()


###############################################################
##
##               Model with two ML supervised options
##
##               DT
##               NB (multinomial)
##
###############################################################
## STEP 1   Create Training and Testing Data
###############################################################
## Write the dataframe to csv so you can use it later if you wish
##
Final_News_DF_Labeled.to_csv("Labeled_News_Data_from_API.csv")
TrainDF, TestDF = train_test_split(Final_News_DF_Labeled, test_size=0.3)
print(TrainDF)
print(TestDF)

#################################################
## STEP 2: Separate LABELS
#################################################
## IMPORTANT - YOU CANNOT LEAVE LABELS ON
## Save labels

### TEST ---------------------
TestLabels=TestDF["LABEL"]
print(TestLabels)
TestDF = TestDF.drop(["LABEL"], axis=1)
print(TestDF)
### TRAIN----------------------
TrainLabels=TrainDF["LABEL"]
print(TrainLabels)
## remove labels
TrainDF = TrainDF.drop(["LABEL"], axis=1)

##################################################
## STEP 3:  Run MNB
##################################################

## Instantiate
MyModelNB= MultinomialNB()

## FIT
MyNB=MyModelNB.fit(TrainDF, TrainLabels)
#print(MyNB.classes_)
#print(MyNB.class_count_)
#print(MyNB.feature_log_prob_)


Prediction = MyModelNB.predict(TestDF)
print(np.round(MyModelNB.predict_proba(TestDF),2))

## COnfusion Matrix Accuracies
cnf_matrix = confusion_matrix(TestLabels, Prediction)
print("\nThe confusion matrix is:")
print(cnf_matrix)


##################################################
## STEP 3:  Run DT
##################################################

## Instantiate
MyDT=DecisionTreeClassifier(criterion='entropy', ##"entropy" or "gini"
                            splitter='best',  ## or "random" or "best"
                            max_depth=None,
                            min_samples_split=2,
                            min_samples_leaf=1,
                            min_weight_fraction_leaf=0.0,
                            max_features=None,
                            random_state=None,
                            max_leaf_nodes=None,
                            min_impurity_decrease=0.0,

                            class_weight=None)

##
MyDT.fit(TrainDF, TrainLabels)

#tree.plot_tree(MyDT)
#plt.savefig(temp1)

feature_names=TrainDF.columns
## Having issues with graphviz since the update of Python....
# Tree_Object = tree.export_graphviz(MyDT, out_file=None,
#                     ## The following creates TrainDF.columns for each
#                     ## which are the feature names.
#                       feature_names=feature_names,
#                       class_names=topics,
#                       #["food","sports","bitcoin"],
#                       filled=True, rounded=True,
#                       special_characters=True)

# graph = graphviz.Source(Tree_Object)
# graph.render("MyTree", format='png')
####################################################......


## COnfusion Matrix
print("Prediction\n")
DT_pred=MyDT.predict(TestDF)
print(DT_pred)

bn_matrix = confusion_matrix(TestLabels, DT_pred)
print("\nThe confusion matrix is:")
print(bn_matrix)


FeatureImp=MyDT.feature_importances_
indices = np.argsort(FeatureImp)[::-1]
## print out the important features.....
for f in range(TrainDF.shape[1]):
    if FeatureImp[indices[f]] > 0:
        print("%d. feature %d (%f)" % (f + 1, indices[f], FeatureImp[indices[f]]))
        print ("feature name: ", feature_names[indices[f]])