How to Get Started with Git and GitHub – Ami Gates

– Official GitHub.com web site: https://github.com/
– Git and GitHub.com cheat sheet: https://education.github.com/git-cheat-sheet-education.pdf
– Git Reference Manual: http://git-scm.com/docs
– Git Overview Book: http://git-scm.com/book/en/v2
– GitHub Help Docs: https://docs.github.com/en/get-started
– Book on Git https://gitbookdown.dallasdatascience.com/
What is Git?
- Git is a free and open source distributed version control system designed to handle everything from small to very large projects with speed and efficiency. https://git-scm.com/book/en/v2/Getting-Started-What-is-Git%3F
- Git can be used by itself on your computer or it can be used along with a GitHub.
- GitHub is an online software development platform. It’s used for storing, tracking, version control, access control, project flow, and collaborating on software projects.
Why Use Git/GitHub
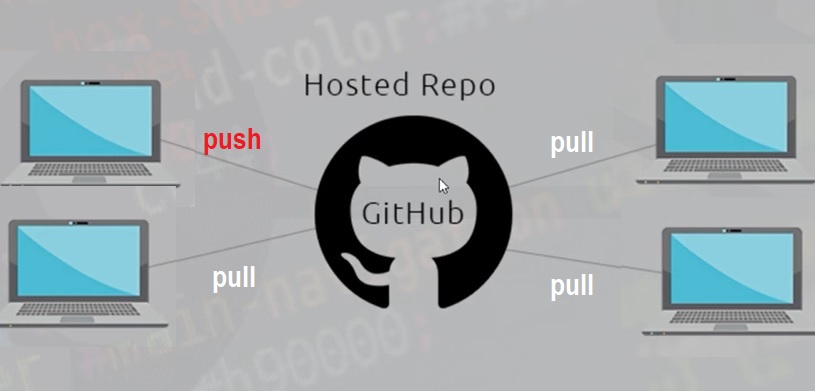
Suppose you want to work on a project with a team of developers. Git and GitHub will allow and facilitate sharing, pushing, pulling, cloning, merging, version control, collaboration, project flow, and more!
First – we need to get Git and talk a little bit about how it works. This is just an introduction as Git can do MANY things 🙂
Next, we will get GitHub and will talk a little bit about how to push, pull, clone, branch, fork, and share projects.
OK – let’s go!! and remember – this is just an introduction and both Git and GitHub can a very large number of options.
Download Git
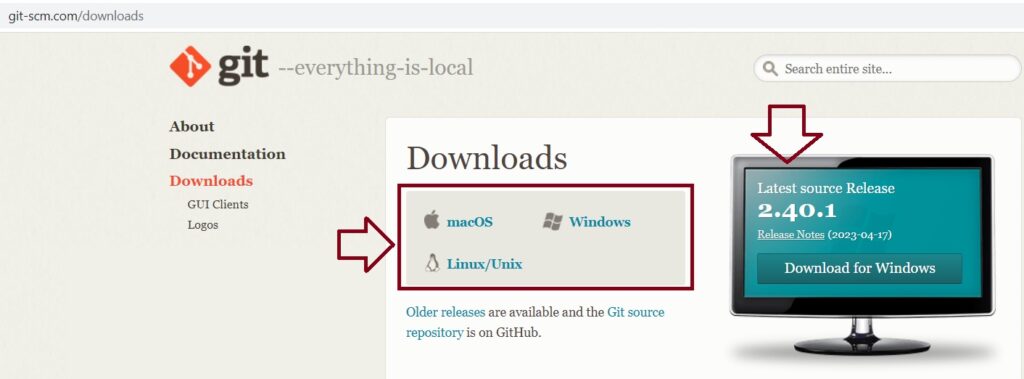
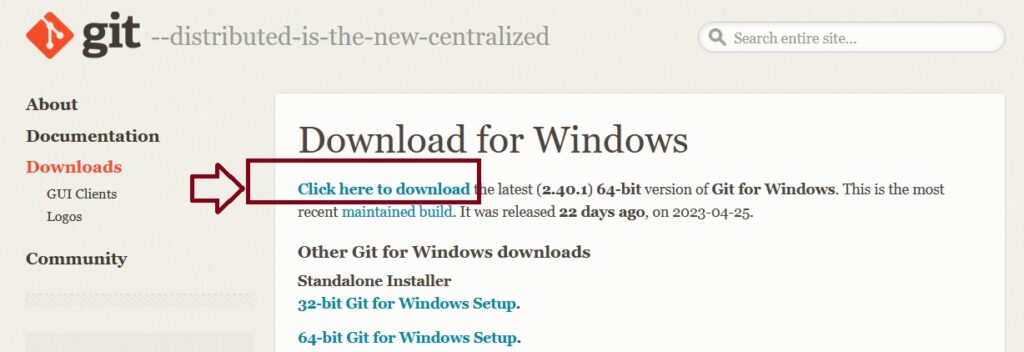
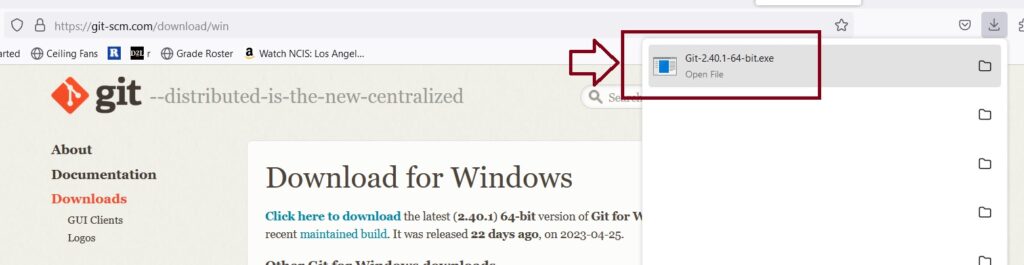
- Go to https://git-scm.com/
- Choose “downloads” (https://git-scm.com/downloads)
- Select your OS – such as Windows, macOS, or Linux.
- Be sure you have the latest version.
NOTES:
Go through the installation process. For most elements, you can use the default unless you have a specific preference. For example, I choose “main” for the default branch name for new repositories. You can also choose to auto-open the Git Bash terminal.
You can also use any other terminal on your machine. However, this tutorial will use Git Bash which comes with the Git-Windows installation. On a MAC you can use the terminal.
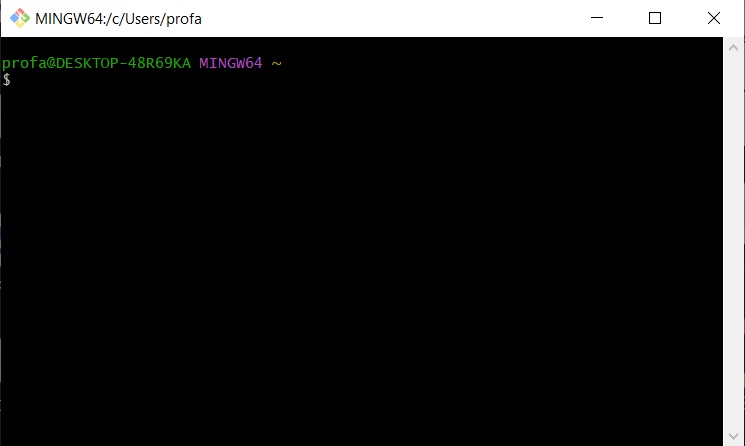
Next – check the installation and open the Git Bash terminal window.
The Git Bash Terminal:
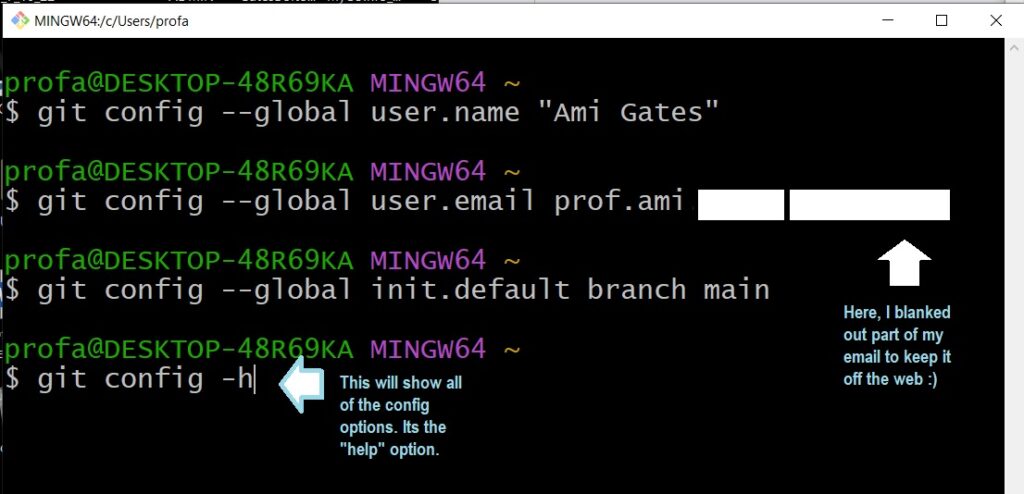
Tell Git who you are – Configurations:
Here, we will tell Git our name and email address so that when we do things like commit or change, etc. Git knows who we are.
The following image will show:
- Configuring Git to know who you are.
- Configuring Git to know your email address.
- Configuring Git to call branch names for new repos as “main”. Note that this is not necessary if you selected this option during the installation, but it OK to do it again either way 🙂
- The last command here is what to type if you want to see all the options for “config”. You can also use “git help config” which opens a help file that will open whether or not you are on the web.
Let’s Create Some Files and Then Use Git and GitHub to Manage and Share
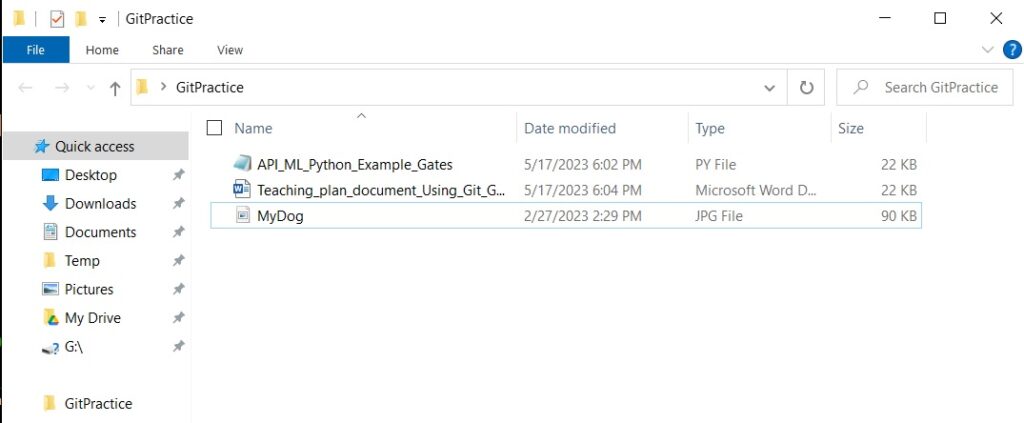
- For this tutorial, let’s create a new folder that contains some files that we want to manage and eventually push on to GitHub to share. The first step is to choose a good location on your computer and create a new folder called GitPractice.
- On my computer, this is the location of my new GitPractice folder. Your path (location) will be different. C:\Users\profa\Desktop\GitPractice
- Next, create and save three files into my new GitPractice folder. You can use files you have or you can create news ones. The first will be a Python (.py) file and the second will be a Word Doc (.docx), and the last will be an image (.jpeg). You can create and/or use any files you wish. Here is an example…
Using Git – a Few Examples
Let’s use Git to do a few things with our three files and our GitPractice folder. Once we do a few things on our computers using Git, we will then get GitHub and take the next steps. But – first things first 🙂
Remember – your GitPractice folder has a location (or path) on your computer. Be sure you know this path.
Mine is: C:\Users\profa\Desktop\GitPractice
Now – let’s use Git to track these files. Git can “keep track” of changes made over time so that we can go back to an old copy or branch. (Don’t worry – we will talk abut branching a bit later…).
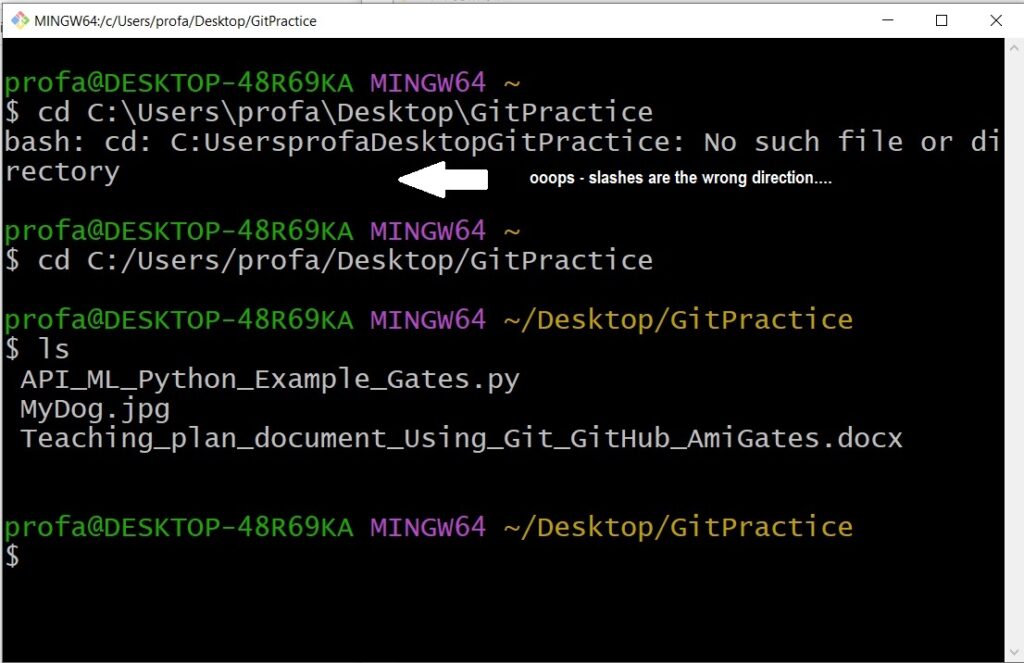
The following image will show three things. First, using Git Bash I want to change directories (cd) to the location were my GitPractice folder is. Speficially, I want to change to C:\Users\profa\Desktop\GitPractice.
!! HOWEVER !! If I use “paste” and paste the path (C:\Users\profa\Desktop\GitPractice) in and press enter in the Git Bash, notice that it tells me that there is no such file or directory. However, I know there is 🙂 The issue here is the slash direction.
For Git Bash on Windows, the slashes must be: C:/Users/profa/Desktop/GitPractice
Once I “cd” (change directory) to my GitPractice folder, I can then use “ls” to list (see) all the files and folders in that directory. (Side Note: Directory and Folder mean the same thing.)
Create a Repo (Repository – which is a fancy word for Folder 🙂
Now that we are in the GitPractice folder, we can use git init to convert this to a Git Repository (Repo from here on). Notice that Git has told us that this is now a Git repository. But why is it “empty”?? We know there are three files in it. The answer is that we still need to ask Git to track those files. Let’s do that next.
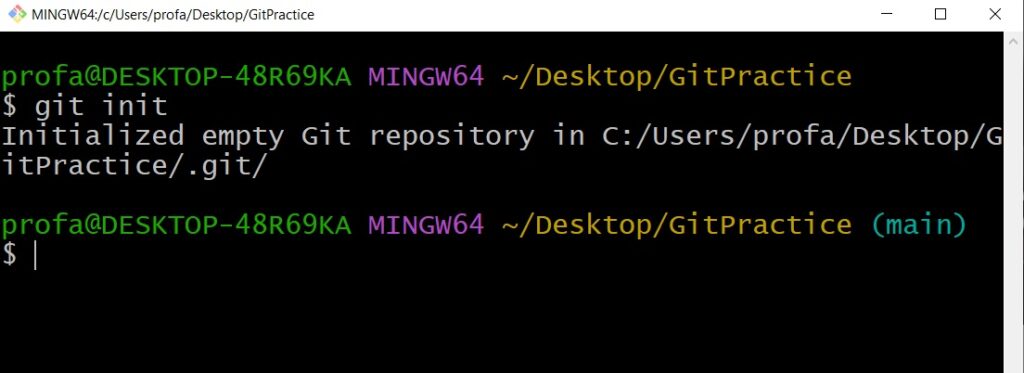
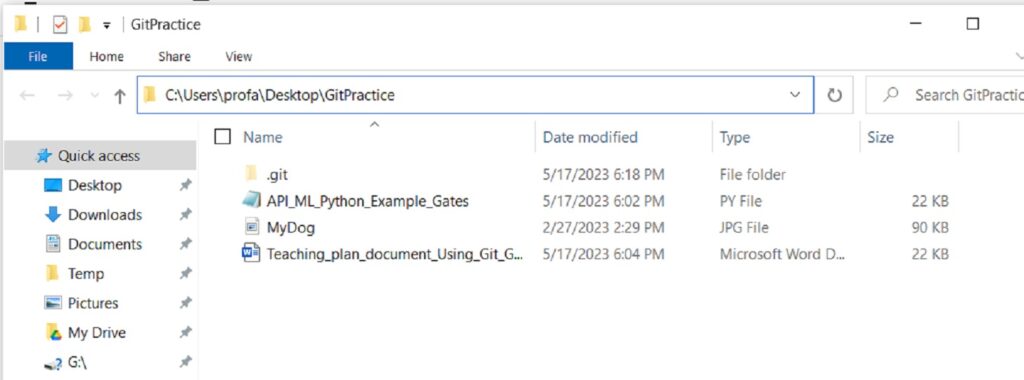
As an aside, you can now View the Hidden Files in GitPractice and you will now see .git.
OK – let’s pause for a second. Here is what we have done so far.
- We downloaded and installed Git to our personal computer.
- We used Git Bash (or another terminal) to configure our name and email.
- We let Git know that we want to name all initial “branches” as “main”. We will talk about branches and branching a bit later 🙂
- Next, we created a folder on our computer called GitPractice and we placed a few files into that folder.
- We then used the Git Bash Command Line (CLI) (or another terminal) and git init to turn this folder into a repository (or repo).
- So – now – on our computer we each have a folder called GitPractice that contains some files and is a Git Repo.
- What’s Next….
Look At the Status of the Items in the Repo
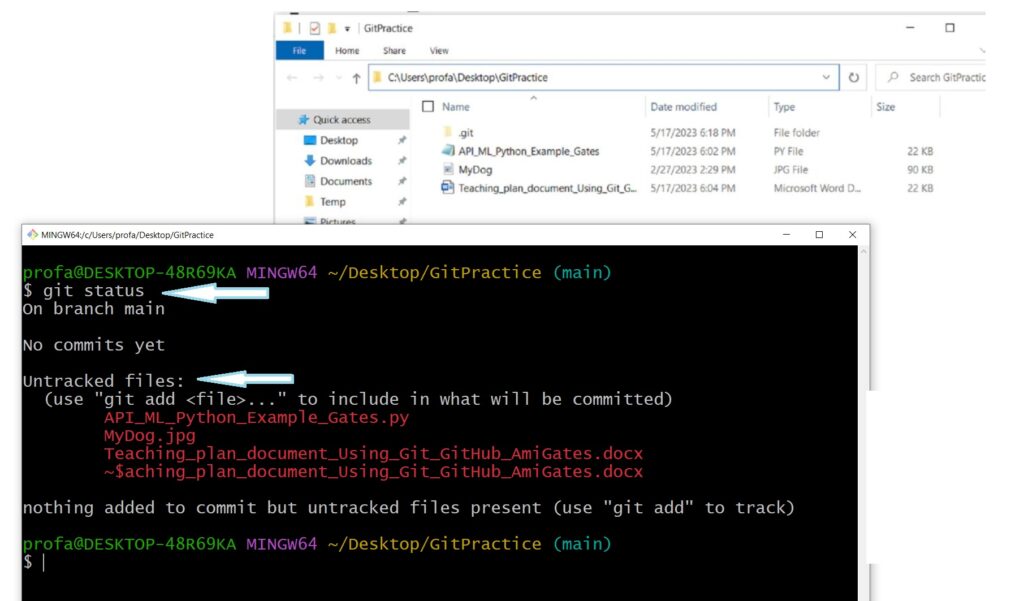
Here, you can see a few things:
- Notice that all three files are listed in the Git Bash terminal.
- Notice that the “Teaching_plan_document_using_Git_GitHub_AmiGates.docx document is BOTH listed and is listed with a “~”. This is because that file is open on my computer right now.
- Finally, notice that all of our files currently in our GitPractice Repo are “untracked”.
Into Git Bash, type git status
Tracked (and untracked) Files and Folders
Remember that Git is a version control management system. It keeps TRACK of the changes that you (and others) make to files. This allows you (or others) to go back to earlier versions (to view history) and to keep track of the changes being made.
To tell Git to keep track you will ask Git to track your files, etc.
NOTICE: You may not want Git to track all files. This is a more advanced idea, but just keep it in mind for now.
For this example, we will ask Git to track all of our files so that as we make changes, a history of those changes will be retained, can be retrieved, and we can go back to an older version if we wish. We can also BRANCH from any version – but more on that later 🙂
Tell Git to Track your Files in the GitPractice Repo
Option 1: You can tell Git to track specific files. In this case, Git will only keep track of (keep version control on) the files you ask it to track.
Option 2: You can tell Git to track all of your files.
Let’s try both options!
Option 1 – Ask Git to Track Just One File and Check the Status
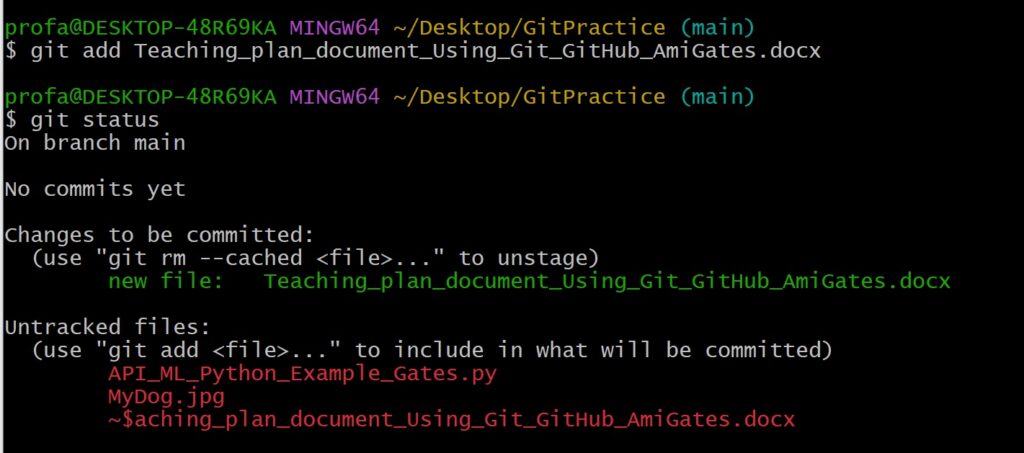
First, let’s use git add to ask Git to track a file called Teaching_plan_document_Using_Git_GitHub_AmiGates.docx
Next, check the status using git status.
Now you can see that one of our three files is now being tracked and can be “committed” (which we will talk about soon). In addition, the other two files are still untracked.
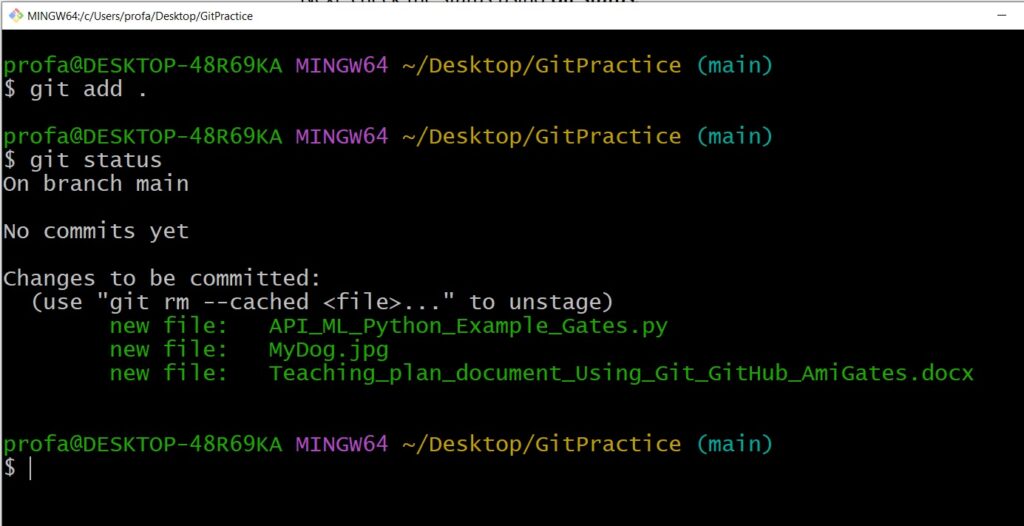
Option 2 – Ask Git to Track All Files in Repo
Here, we will use “git add .” which means to add all of the files (the “.” means all). Now you can see that all files are being tracked and can be committed. You can also see that you can untrack a file as you wish.
What Happens When you Change a Tracked File?
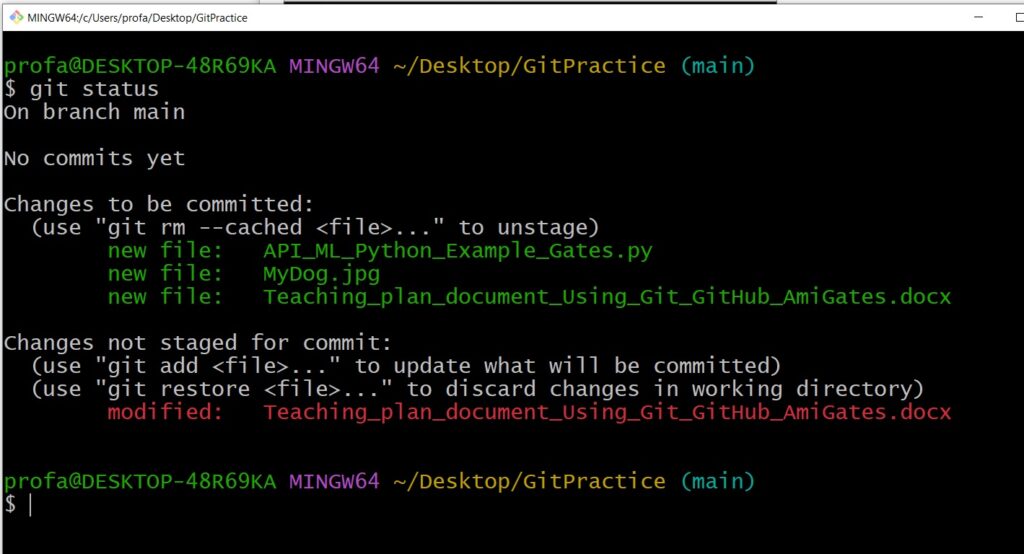
Let’s make a small change to the Teaching_plan file.
After we make a change, use the Git Bash to type git status again to see what it does.
Notice that git has noted that a file has been “modified”.
Overall: Any file that is being tracked by git will have a “history”. You can go back to old version and all changes are saved and noted. In addition, you can use git diff to see the differences between the last version and the new version.
Untracked – Tracked – Staged – Committed
- Files can be untracked. In this case, Git will ignore these files and any changes to them.
- Files can be tracked. Tracked files are files that Git “keeps track of”.
- A file is called staged when it is both being tracked and has been “added” and so can then be committed later.
- Committing is when you tell git to “write that version of the file to history“. So, for example, you could open a tracked file, make 100 changes, then “add” it to the “staging area” so that it can be “committed”.
- Files that have been added to staging can be committed.
- Staging is a place where tracked files sit until you are ready to commit them.
To Commit Your Files
To commit your files, use the command git commit -m “Test Commit”. It is required that you place a comment describing the commit in quotes. Do not skip this 🙂
Let’s try a few things:
- Let’s check the current status of our GitPractice Repo.
- Next, let’s edit one of the files BUT let’s also NOT add it back to the staging area but rather let’s leave it as what is called a working file which is a file that has not yet been added and so cannot yet be committed.
- Then, after we commit the other two files, we will recheck the status and the log.
- Finally, we will add the edited file back to staging and commit it.
- Keep in mind that the number of options for “doing stuff” using Git is infinite 🙂
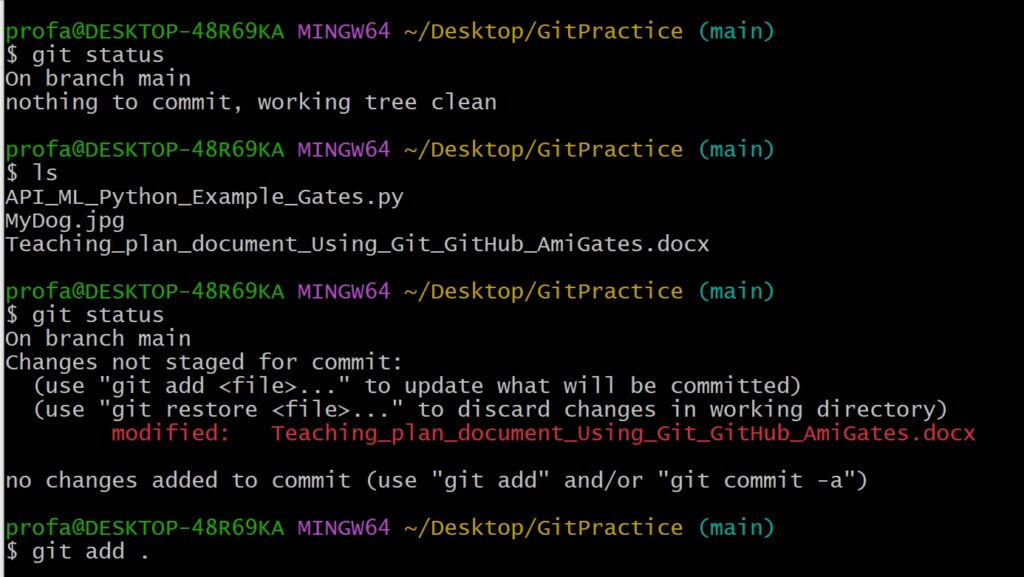
Here – so far – we use “ls” to list the files in our GitPractice Repo.
Next, we edited one of the files called “Teaching_plan_document_Using_Git_GitHub_AmiGates.docx. After this edit, when we use git status we can see the modification.
Then, we used git add . to assure that all files in the Repo can be committed.
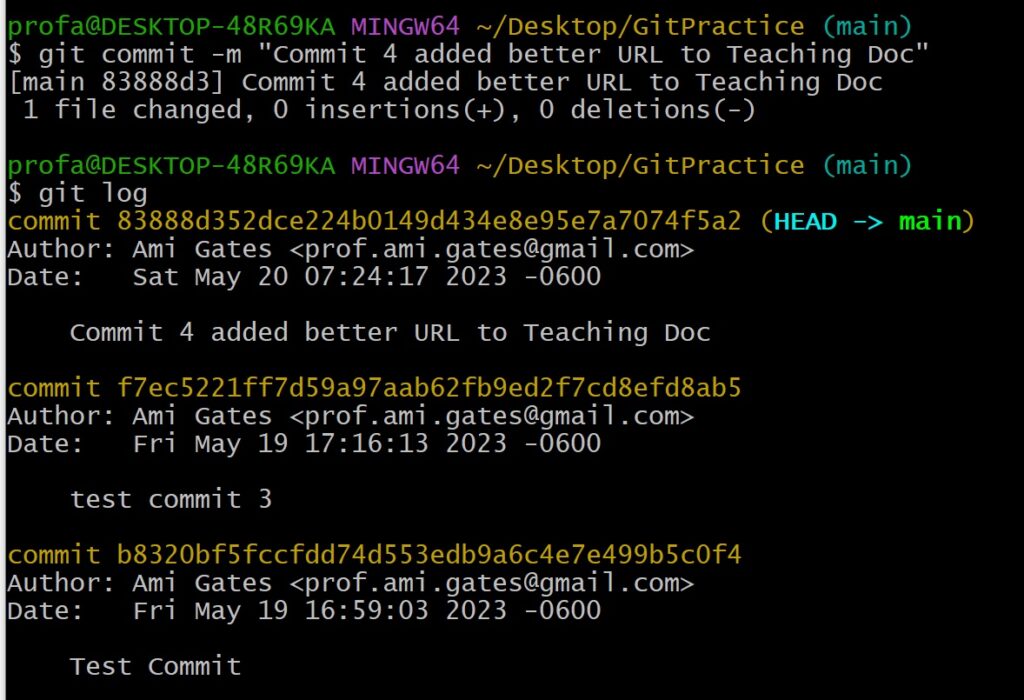
Here, we used the git commit -m “comments area” to commit all files and any updates to the history logs.
Finally, we can see all of our commits using git log.
Now – we are ready to get and use GitHub
Get GitHub
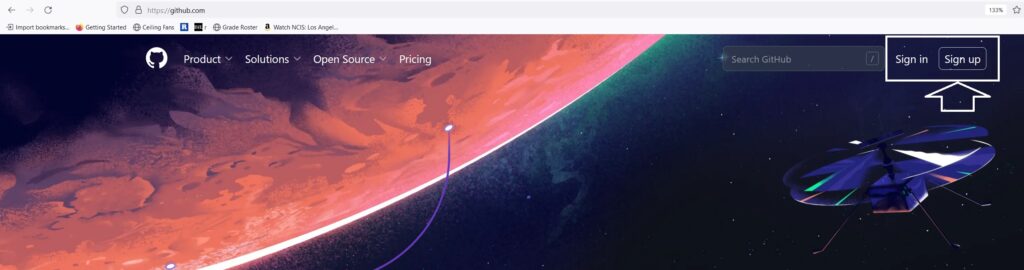
If you already have an account on GitHub you can sign in. If you do not yet have an account you can Sign Up!
As you go through the sign up process, you will be asked a few questions, will create a passcode and a usernsame, will need an email address, etc. Follow the process carefully.
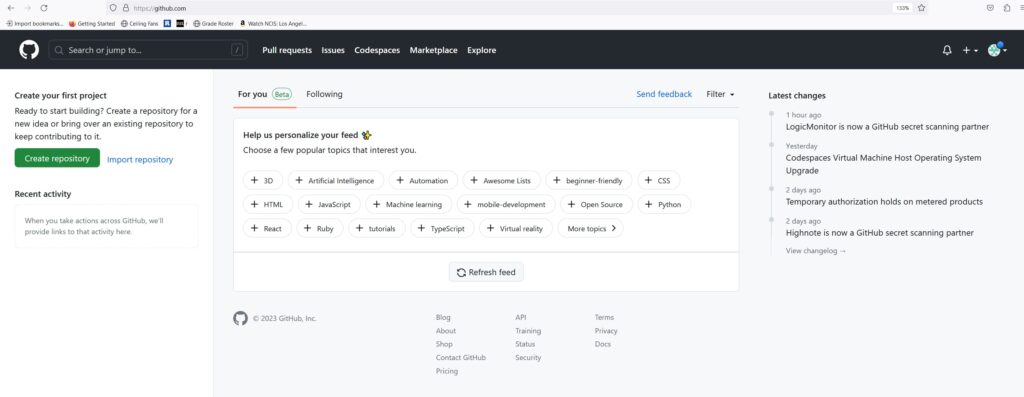
The GitHub Dashboard
Once you complete your Sign In (or Sign Up) you will access your GitHub Dashboard
Things to Notice of the GitHub Dashboard
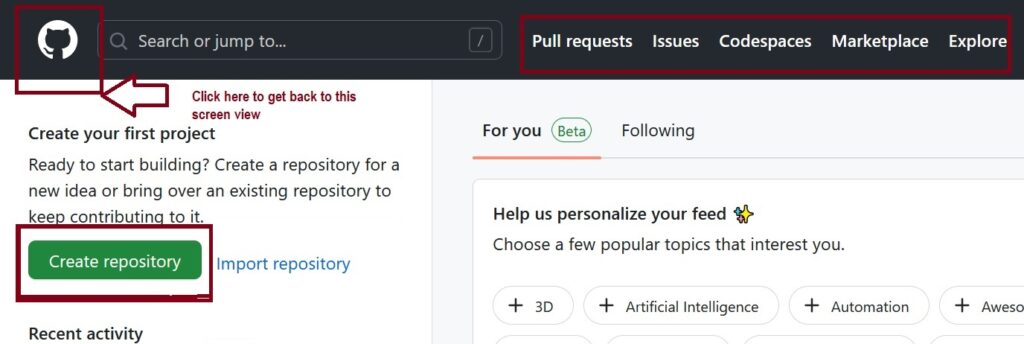
First, you can always click on the cat to get back to this main dashboard area.
Next, on the left you can create a repo (repo is short for repository) or you can import a repo.
Before we look at the other options, let’s do this first!
Recall that you created a repo on your computer (see above) called GitPractice. In that repo are three files. We will now place our GitPractice Repo into GitHub.
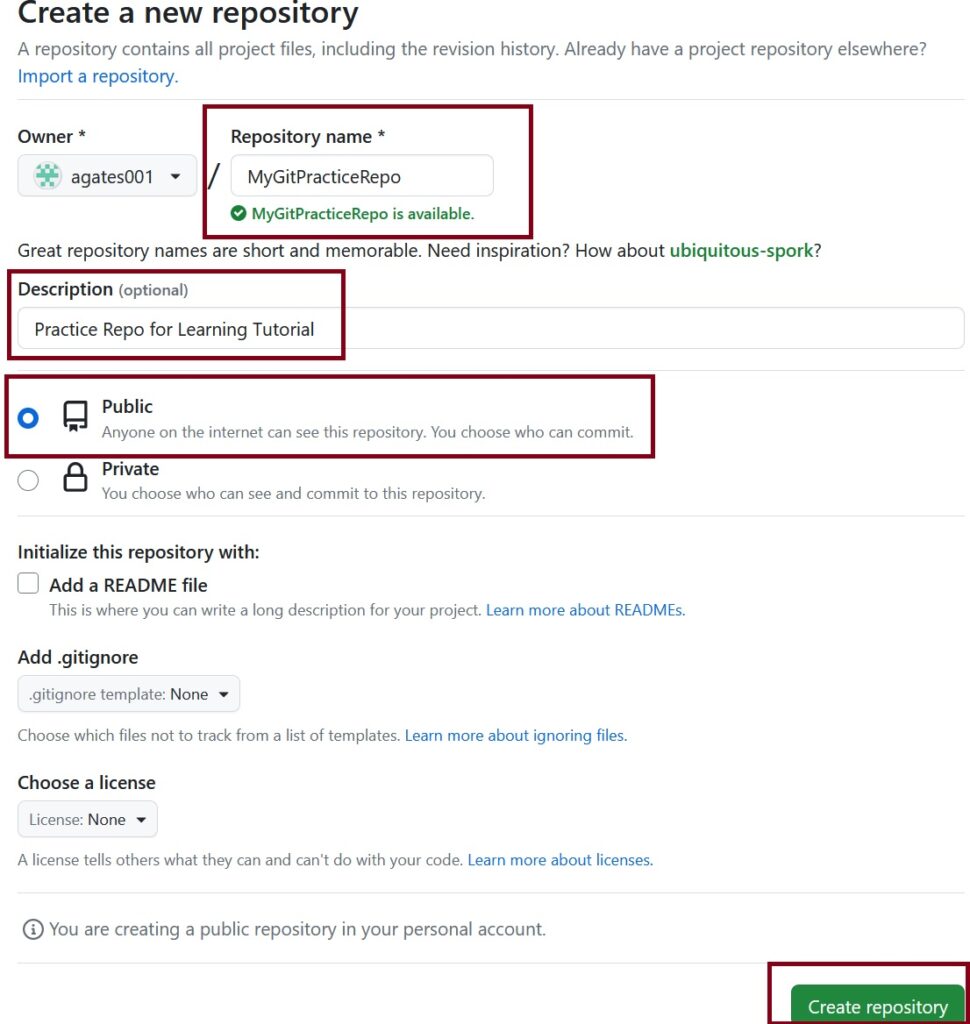
STEP 1: Create a New Repo
Click the green “Create repository” button. Then, on the next screen, give the repo a name, description, and set it to public. You can use everything else blank.
Once you click “Create repository” you will see the following. In our case, we already have a repo (GitPractice) that we have been working with on our computer. Let’s use our Git Bash and the instructions here to bring our repo into GitHub. This is called a push.
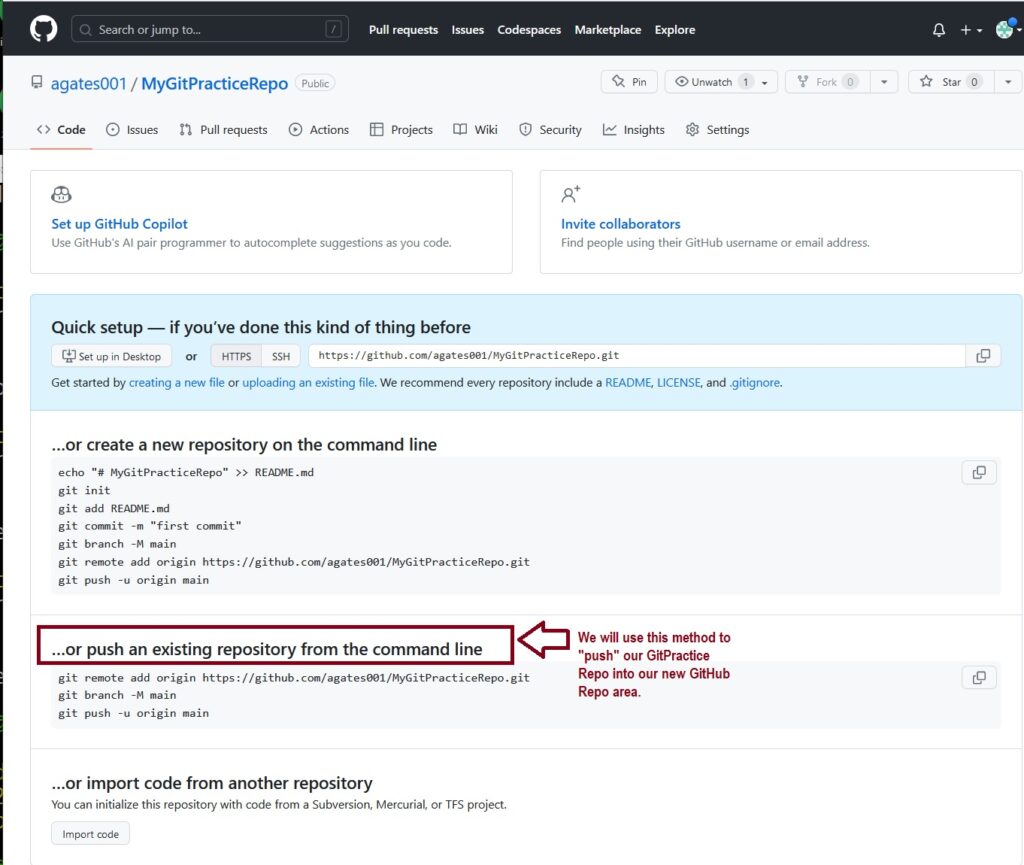
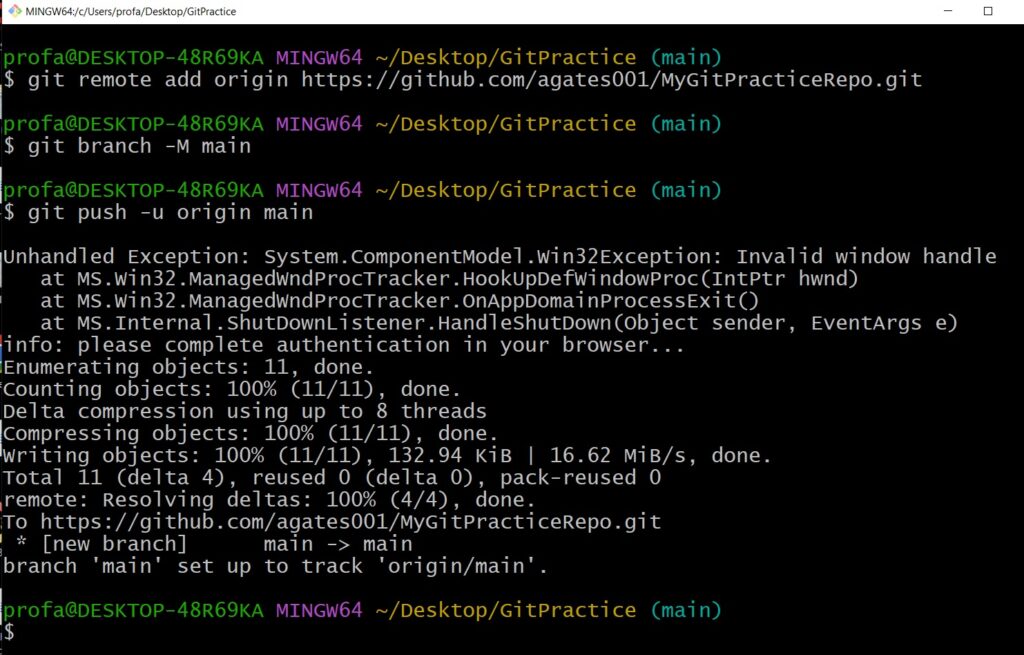
STEP 2: Use these three commands on your Git Bash (on your computer) to push your repo into GitHub. We can see that it worked and that our GitPractice Repo is now on our GitHub.
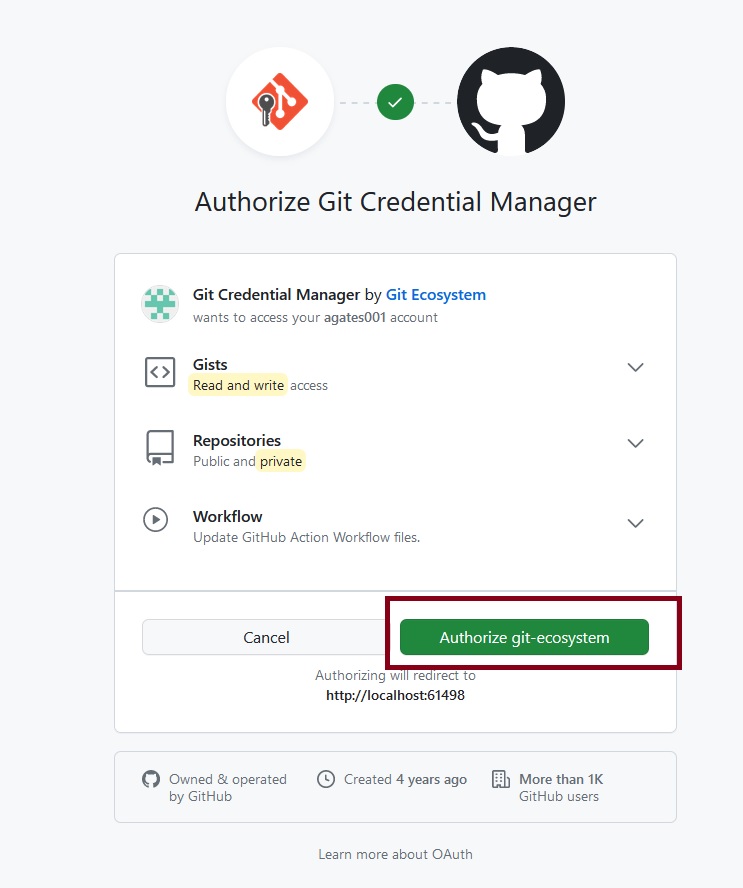
IMPORTANT NOTE: The first time you do this, you may see a screen that looks like the following and asks you to confirm/authorize. This is OK. Just confirm and the process will complete.
STEP 3: Click your new Repo Name To See your Files
Here, my new repo is called “MyGitPracticeRepo”.
I can see all three of my files have been successfully pushed into GitHub. I can also see that my GitHub Repo is public – so that others can now work with me on these files.
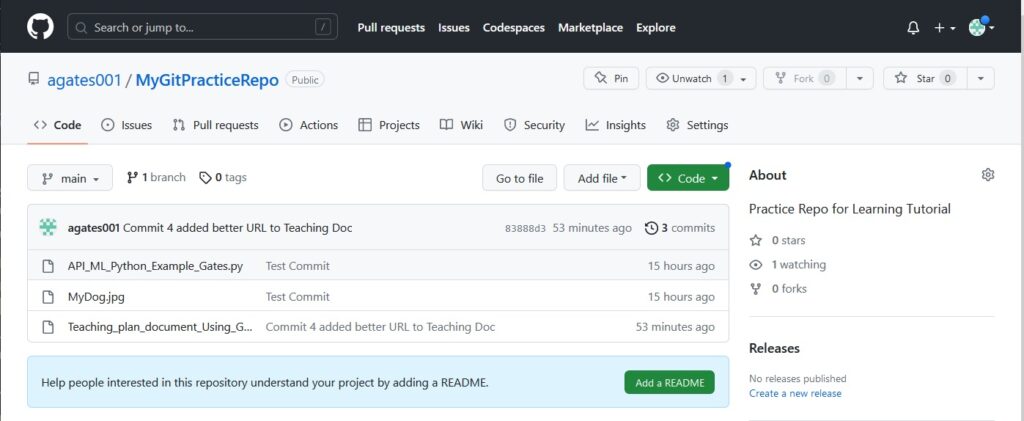
Anyone can Clone (copy) my Git Repo – its Public
Option 1: Clone (Grab a Copy) by Downloading the .zip
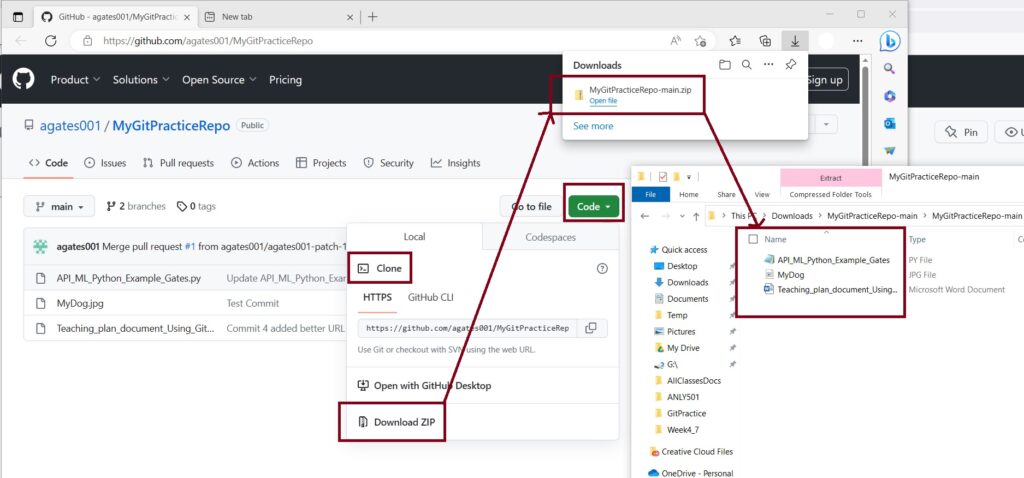
Option 2: Use Git Bash to save a clone (copy) of a repo on your personal computer
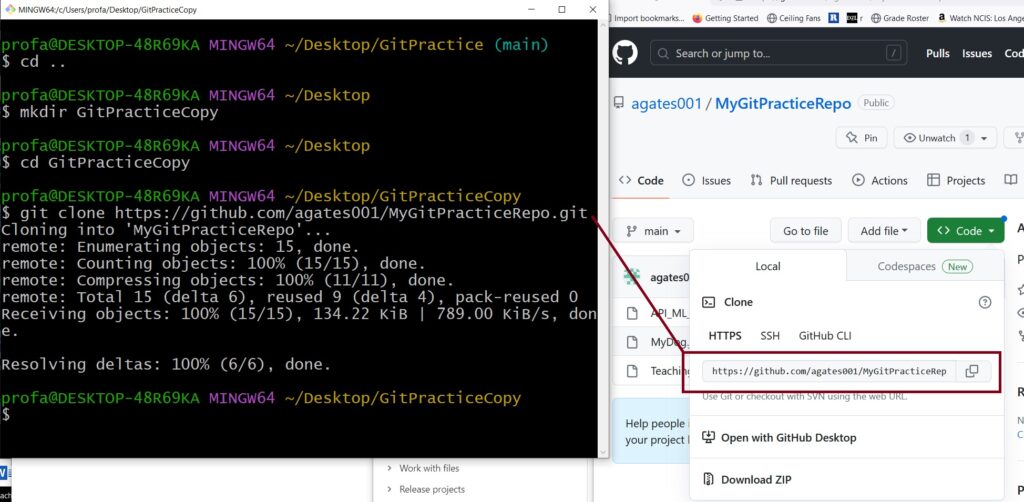
- Here, I will first use Git Bash to change directory using cd ..
- The cd .. goes back one directory. If you are new to command line – that’s OK! Try this to see what it does 😉
- Next, I will then create a new folder (directory) using the command mkdir
- Then, I will use the URL and the command git clone to clone (copy) the repo from my GitHub (or any GitHub repo that is public) to my computer (to the folder/directory I just made).
- Here are the steps….
Notice that when I type cd .. I went back one directory from GitPractice to Desktop.
Next, notice that when I used mkdir GitPracticeCopy I created a new folder (directory) on the desktop.
Finally, using git clone and the URL given on GitHub, I created a copy (a clone) of the repo into the new GitPracticeCopy folder.
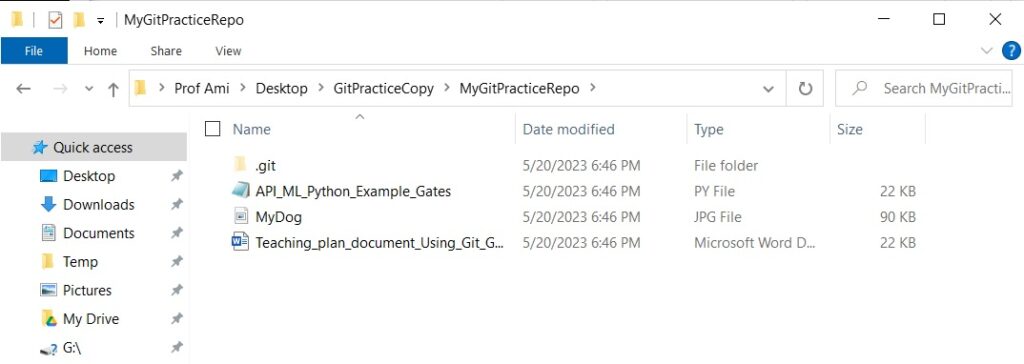
Here we can see the new GitPracticeFolder and inside you can see the copy – the clone – of MyGitPracticeRepo from GitHub.
HOW TO Push/Pull
Suppose you have a clone of a project from a GitHub Repo. Next, you made some changes and want to push those changes back into the GitHub repo. The following will show how to first “pull” the repo to assure consistency and then to push up your changes. While there are other methods, this options tends to work well :).
Notice the pull and then the push.
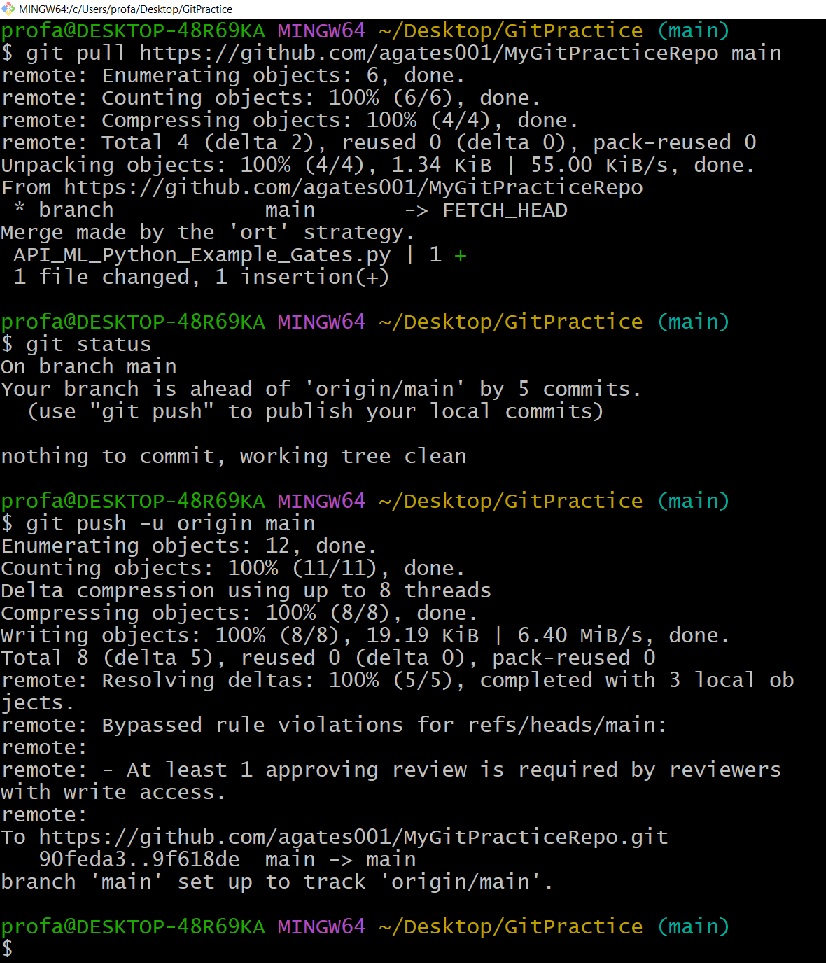
NOTICE – you can get the URL for the GitHub Repo here – see the URL in the red box.

Project Collaboration
Once there is a public Repo on GitHub containing a project – any developers can clone the project, work on it on their own computers, and then merge the changes.
From here, there are an infinite number of options and methods for project collaboration and DevOps. The following will offer a few more definitions.
For more – check out the GitHub documentation:
Forks and Branches
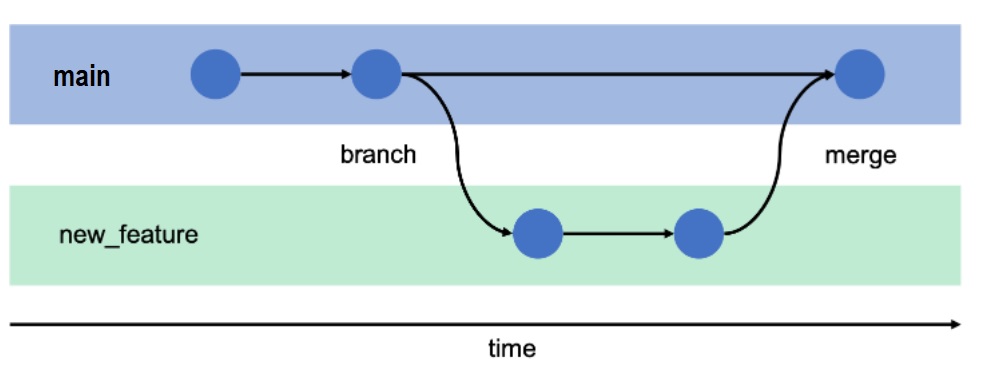
Branches allow you to develop features, fix bugs, or safely experiment with new ideas in a contained area of your repository. You always create a branch from an existing branch. Typically, you might create a new branch from the default branch of your repository.
Learn all about Branches on GitHub HERE:
Branch: independent line of development typically used to develop new features without disturbing the rest of the repository. The default branch is called the “Master” branch. In our case, our master branch (also sometimes called a trunk) is called main.
The term fork (in programming) derives from a Unix system call that creates a copy of an existing process. So, unlike a branch, a fork is independent from the original repository. If the original repository is deleted, the fork remains. If you fork a repository, you get that repository and all of its branches.
A fork is a copy of the repository that can be further developed but that will likely not be remerged. Using fork can allow you to work on someone else’s project freely without affecting the project. So, forking means creating a copy of the repo on your GitHub account without having to bother disturb or involve the original project or users.
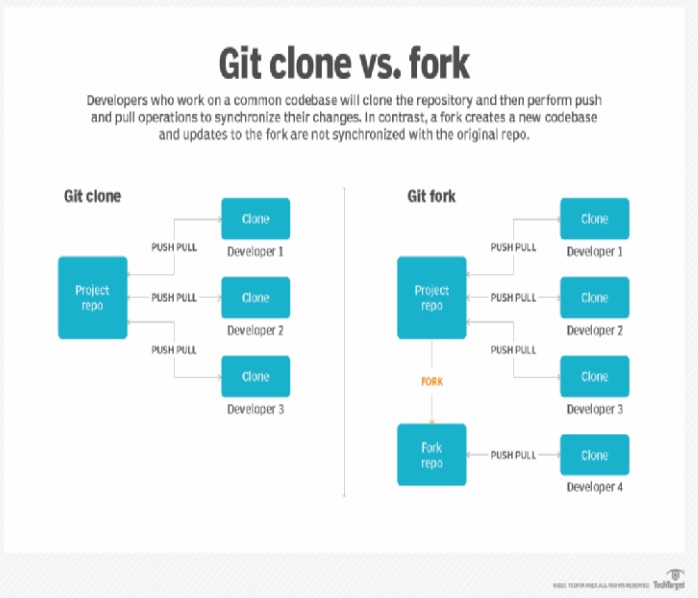
Let’s Compare: Branch, Fork, and Clone
- Branching is used to pull the current project version, add functionality/content, and then eventually re-merge (reintegrate) that changes back into the project.
- Forking is used to pull the current project version, work on it as desired, but without the goal of re merging or reintegration.
- Cloning is creating a copy (for any reason 🙂
What is Merging and What is PR?
Often, developers all working on the same project will first pull (clone/copy) the current version of the project to their own computers. From there, each developer can work on different areas and functionality of the project. However, eventually, all developers will want to merge/push their additions and updates back into the GitHub remote repo.
Great reference:
Thank you!
Dr.G